廣告

2015年3月30日 星期一

[design pattern] [java] Template Pattern

template pttern:
use abstract class to define template(behavior)
to execute its methods.
And use some class to extend it.
to override the method of superclass.


Programmer

package com.test.templatepattern;

public abstract class Programmer {

 abstract boolean getUP();
 abstract boolean atCompany();
 abstract boolean Home();
 
 public void dailyRoutine(){
  getUP();
  atCompany();
  Home();
 }
}


Seven
package com.test.templatepattern;

public class Seven extends Programmer {

 @Override
 boolean getUP() {
  System.out.println("sleeping");
  return false;
 }

 @Override
 boolean atCompany() {
  System.out.println("coding");
  return false;
 }

 @Override
 boolean Home() {
  System.out.println("sleeping");
  return false;
 }

}


Leo
package com.test.templatepattern;

public class Leo extends Programmer {

 @Override
 boolean getUP() {
  System.out.println("meeting");
  return false;
 }

 @Override
 boolean atCompany() {
  System.out.println("meeting");
  return false;
 }

 @Override
 boolean Home() {
  System.out.println("meeting");
  return false;
 }

}


Lewis
package com.test.templatepattern;

public class Lewis extends Programmer {

 @Override
 boolean getUP() {
  System.out.println("coding");
  return false;
 }

 @Override
 boolean atCompany() {
  System.out.println("coding");
  return false;
 }

 @Override
 boolean Home() {
  System.out.println("coding");
  return false;
 }

}


testTemplatePattern

package com.test.templatepattern;

public class testTemplatePattern {

 public static void main(String[] args) {
  /*
  template pttern:
  use abstract class to define template(behavior) 
  to execute its methods.
  And use some class to extend it.
  to override the method of superclass.
  */
  
    Programmer lewis = new Lewis();
    lewis.dailyRoutine();
       System.out.println();
      
       Programmer leo = new Leo();
       leo.dailyRoutine();
       System.out.println();
       
       Programmer seven = new Seven();
       seven.dailyRoutine();
       System.out.println();
 }

}


console
coding
coding
coding

meeting
meeting
meeting

sleeping
coding
sleeping


2015年3月28日 星期六

[git] 基本git使用 tutirial 1 (add, commit, push, pull)

由於最近我們team的版本控管要從SVN轉為git,
所以想說寫個基本的git的筆記,
之前都是用github的gui所以對一些commamd還不太熟,
雖然eclipse也支援git的功能,
不過還是練習一下command吧!!

但礙於公司規定所以每晚還是要將git
同步到svn,真是辛苦fai大了!

我們這邊使用的server為gitlab。

首先我們先在gitLab上創一個空的project,
(當然你也可以在本機創好在push上去,會這樣
做是因為gitlab有提供語法XD)


git 與 svn最大不同在於
svn是直接commit到server端,
並且本機不會有其他版本的資訊,

git則是每次commit都是先到自己的本機,
再用push送到server,所以本機會有自己完整
的版本資訊,

其實我還是喜歡用svn的,
自己以前還直接在研究室的電腦架svn server XD,

進入正題:

設定個人資訊:
可以用以下指令查看,
git config --list

user.name=lewisli
user.email=lewisli.acer@gmail.com
又或者是到 .gitconfig中察看,

設定個人資訊
git config --global user.name "lewisli"
git config --global user.email "lewisli.acer@gmail.com"

當然也可以針對此目錄設定local的個人資訊。
http://lewisli1.blogspot.tw/2015/03/git-specify-multiple-users-user-local.html
接著輸入以下指令
用來建立此目錄的git設定檔與gitlab的連結,
mkdir gitTutorial
cd gitTutorial
git init
touch README.md
git add README.md
git commit -m "first commit"
git remote add origin http://XXX.xxx.xxx.xxx:7070/lewisli/gitTutorial.git
git push -u origin master

-m的意思是說 要加入message(版本控管 log很重要阿)
其他可用 git commit -h 自己看


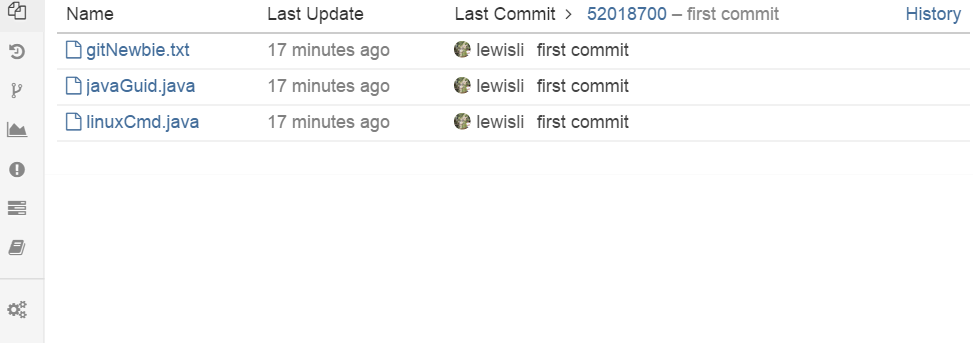
如此成功上傳了
可用
git log --stat
git log -p 
來查看commit資訊


clone git server上面的專案
git clone http://XXX.xxx.xxx.xxx:7070/lewisli/gitTutorial.git

通常一個project會有一些不需commit的檔案,
所以可以在.gitignore做設定,
git會去讀這個檔案來知道哪些檔案不需要上傳,
參考
http://lewisli1.blogspot.tw/2015/03/git-gitingore-white-list.html


===================================================

注意1:clone與github上的fork是不同的
詳見:
http://luckyyang.github.io/blog/2013/03/23/fork-you-github/
http://site.douban.com/196781/widget/notes/12161495/note/269163206/

注意2:clone,pull , fecth 是不同的
詳見:
http://blog.mikepearce.net/2010/05/18/the-difference-between-git-pull-git-fetch-and-git-clone-and-git-rebase/

2015年3月26日 星期四

[eclipse] Access restriction on class due to restriction on required library rt.jar


  . 問題 : [eclipse]換workspace時發生
            =>Access restriction on class due to 
              restriction on required library rt.jar 
  
  . 解法 : 方法1
            1. Go to the Build Path settings in the project properties. 
            2 Remove the JRE System Library 
            3 Add it back; Select "Add Library" and select the JRE System Library. 

           方法2 
            window - > java -> compiler -> error/warning -> deprecated and restricted api 把 forbidden reference 將 error change to warning
     

[design pattern] [java] Facade Pattern

我認為wiki寫的蠻清楚的,這邊直接貼上說明
A facade is an object that provides a simplified interface to a larger body of code, such as a class library. A facade can:
  • make a software library easier to use, understand and test, since the facade has convenient methods for common tasks;
  • make the library more readable, for the same reason;
  • reduce dependencies of outside code on the inner workings of a library, since most code uses the facade, thus allowing more flexibility in developing the system;
  • wrap a poorly designed collection of APIs with a single well-designed API (as per task needs).
The Facade design pattern is often used when a system is very complex or difficult to understand because the system has a large number of interdependent classes or its source code is unavailable. This pattern hides the complexities of the larger system and provides a simpler interface to the client. It typically involves a single wrapper class which contains a set of members required by client. These members access the system on behalf of the facade client and hide the implementation details.


Animal.java
package com.test.facadepattern;

public interface Animal {

 void printMsg();
 void getFeet();
 void life();
}


Bird.java
package com.test.facadepattern;

public class Bird implements Animal{

 @Override
 public void printMsg() {
  // TODO Auto-generated method stub
  System.out.println("bird class");
 }

 @Override
 public void getFeet() {
  // TODO Auto-generated method stub
  
 }

 @Override
 public void life() {
  // TODO Auto-generated method stub
  
 }
 

}


Cat.java
package com.test.facadepattern;

public class Cat implements Animal {

 @Override
 public void printMsg() {
  // TODO Auto-generated method stub
  System.out.println("cat class");
 }

 @Override
 public void getFeet() {
  // TODO Auto-generated method stub
  
 }

 @Override
 public void life() {
  // TODO Auto-generated method stub
  
 }


}


Dog.java
package com.test.facadepattern;

public class Dog implements Animal{

 @Override
 public void printMsg() {
  // TODO Auto-generated method stub
  System.out.println("dog class");
 }

 @Override
 public void getFeet() {
  // TODO Auto-generated method stub
  
 }

 @Override
 public void life() {
  // TODO Auto-generated method stub
  
 }


}


Zoo.java
package com.test.facadepattern;

public class Zoo {

 private Animal bird ;
 private Animal cat ;
 private Animal dog ;
 
 public Zoo(){
  bird  = new Bird();
  dog   = new Dog();
  cat   = new Cat();
 }
 
 public void imDog(){
  dog.printMsg();
 }
 
 public void imBird(){
  bird.printMsg();
 }
 
 public void imCat(){
  cat.printMsg();
 }
 
}


testFacadePattern .java
package com.test.facadepattern;

public class testFacadePattern {

 public static void main(String[] args) {
  
  Zoo zoo = new Zoo();
  
  zoo.imBird();
  zoo.imCat();
  zoo.imDog();
  
 }

}


console
bird class
cat class
dog class

[git] .gitingore , white list | ignore every except XXX & XXX


*
#ignore all

!src/
#file under the src/ won't be ignored

!.build.properties
#build.properties won't be ignored

2015年3月25日 星期三

[git] specify multiple users | 指定不同的user (local & global)

因為小弟之前只有再用githib,
當初安裝時他就幫我設定好user的相關資訊,
而且是global的


git config --global user.name "Your Name Here"
git config --global user.email your@email.com

但現在團隊要用gitlab來控管專案
我總不能用我github的身分來做動作吧.

所以隊要開發的專案設一個user

git config user.name "Your Name Here"
git config user.email your@email.com

2015年3月17日 星期二

[java][designPattern] observer pattern

這個用法其實 在android 的 listView or gridview就有被使用
這兩個元件用完都需要呼叫 notifydatachange() 來更新畫面

Color.java
package com.test.observerpattern;

public abstract class Color {
 protected DrawBoard drawBoard;
 public abstract void update();
}


DrawBoard.java
package com.test.observerpattern;

import java.util.ArrayList;
import java.util.List;

public class DrawBoard {
 private List colors = new ArrayList();
 private String state;

 public String getState() {
  return state;
 }

 public void setState(String state) {
  this.state = state;
  notifyAllObservers();
 }

 public void addColor(Color observer) {
  colors.add(observer);
 }

 public void notifyAllObservers() {
  for (Color color : colors) {
   color.update();
  }
 }
}


Pain1.java
package com.test.observerpattern;

public class Pain1 extends Color {
 public Pain1(DrawBoard drawBoard) {
  this.drawBoard = drawBoard;
  this.drawBoard.addColor(this);
 }

 @Override
 public void update() {
  System.out.println("Pain1's color is :"+drawBoard.getState());
 }
}


Pain2.java
package com.test.observerpattern;

public class Pain2 extends Color {
 public Pain2(DrawBoard drawBoard) {
  this.drawBoard = drawBoard;
  this.drawBoard.addColor(this);
 }

 @Override
 public void update() {
  System.out.println("Pain2's color is :"+drawBoard.getState());
 }
}


testObserverPattern.java
package com.test.observerpattern;

public class testObserverPattern {
    public static void main(String[] args) {
     DrawBoard drawBoard = new DrawBoard();

       new Pain1(drawBoard);
       new Pain2(drawBoard);

       System.out.println("Change pain color to red"); 
       drawBoard.setState("red");
       System.out.println("Change pain color to white"); 
       drawBoard.setState("white");
    }
 }


console
Change pain color to red
Pain1's color is :red
Pain2's color is :red
Change pain color to white
Pain1's color is :white
Pain2's color is :white


[java] [designPattern] Null Object Pattern

根據上一篇文章 => java-design-pattern-factory-pattern

這篇做出修改成此篇的標題,


沒列出來的class就同上篇。這篇show出做修改的部分。


NullObject.java

package com.test.nullobjectpattern;
import com.test.factorypattern.animal;
public class NullObject implements animal {

 @Override
 public void printMsg() {
  // TODO Auto-generated method stub
  System.out.println("NullObject class, means i'm null");
 }

 @Override
 public void getFeet() {
  // TODO Auto-generated method stub

 }

 @Override
 public void life() {
  // TODO Auto-generated method stub

 }
}


animalFactory.java
package com.test.factorypattern;

import com.test.nullobjectpattern.NullObject;

public class animalFactory {

 public animal getAnimal(String kind){
  if (null == kind) {
   return null;
  } else if (kind.equalsIgnoreCase("dog")) {
   return new dog();
  } else if (kind.equalsIgnoreCase("cat")) {
   return new cat();
  } else if (kind.equalsIgnoreCase("bird")) {
   return new bird();
  } else {
   return new NullObject();
  }
  
 }
}


TestNullObjectPattern.java
package com.test.nullobjectpattern;

import com.test.factorypattern.animal;
import com.test.factorypattern.animalFactory;


public class TestNullObjectPattern {

 public static void main(String[] args) {
  // TODO Auto-generated method stub
  animalFactory animalfactory = new animalFactory();

  animal dog = animalfactory.getAnimal("dog");
  dog.printMsg();
  
  System.out.println("=========================");
  
  animal cat = animalfactory.getAnimal("cat");
  cat.printMsg();
  System.out.println("=========================");
  
  animal bird = animalfactory.getAnimal("bird");
  bird.printMsg();
  System.out.println("=========================");
  
  animal pig = animalfactory.getAnimal("pig");
  pig.printMsg();
  
 }

}


console
dog class
=========================
cat class
=========================
bird class
=========================
NullObject class, means i'm null


2015年3月16日 星期一

[java ] [Design Pattern] Factory Pattern


animal.java
package com.test.factorypattern;

public interface animal {

 void printMsg();
 void getFeet();
 void life();
}


animalFactory.java
package com.test.factorypattern;

public class animalFactory {

 public animal getAnimal(String kind){
  if (null == kind) {
   return null;
  } else if (kind.equalsIgnoreCase("dog")) {
   return new dog();
  } else if (kind.equalsIgnoreCase("cat")) {
   return new cat();
  } else if (kind.equalsIgnoreCase("bird")) {
   return new bird();
  } else {
   System.out.println("out of type");
  }
  
  
  return null;
 }
}


bird.java
package com.test.factorypattern;

public class bird implements animal{

 @Override
 public void printMsg() {
  // TODO Auto-generated method stub
  System.out.println("bird class");
 }

 @Override
 public void getFeet() {
  // TODO Auto-generated method stub
  
 }

 @Override
 public void life() {
  // TODO Auto-generated method stub
  
 }
 

}


cat.java
package com.test.factorypattern;

public class cat implements animal {

 @Override
 public void printMsg() {
  // TODO Auto-generated method stub
  System.out.println("cat class");
 }

 @Override
 public void getFeet() {
  // TODO Auto-generated method stub
  
 }

 @Override
 public void life() {
  // TODO Auto-generated method stub
  
 }


}


dog.java
package com.test.factorypattern;

public class dog implements animal{

 @Override
 public void printMsg() {
  // TODO Auto-generated method stub
  System.out.println("dog class");
 }

 @Override
 public void getFeet() {
  // TODO Auto-generated method stub
  
 }

 @Override
 public void life() {
  // TODO Auto-generated method stub
  
 }


}


testFactoryPattern.java
package com.test.factorypattern;

public class testFactoryPattern {

 public static void main(String[] args) {
  // TODO Auto-generated method stub
  animalFactory animalfactory = new animalFactory();

  animal dog = animalfactory.getAnimal("dog");
  dog.printMsg();
  
  System.out.println("=========================");
  
  animal cat = animalfactory.getAnimal("cat");
  cat.printMsg();
  System.out.println("=========================");
  
  animal bird = animalfactory.getAnimal("bird");
  bird.printMsg();
  System.out.println("=========================");
  
  animal pig = animalfactory.getAnimal("pig");
  pig.printMsg();
  
 }

}


console
dog class
=========================
cat class
=========================
bird class
=========================
out of type
Exception in thread "main" java.lang.NullPointerException
 at com.test.factorypattern.testFactoryPattern.main(testFactoryPattern.java:23)


2015年3月15日 星期日

[java] Add parameter to httpGet Url by NameValuePair


 ArrayList pairList = new ArrayList();
            pairList.add(new BasicNameValuePair("serviceToken",(String) map.get("serviceToken") ));
            log.info("data to LinkingData:"+pairList.toString());
            String paramString = URLEncodedUtils.format(pairList, "utf-8");
            
            String getUrl = ApiUrl+GetTagListUrl+"?"+paramString;
            System.out.println(getUrl);
            HttpGet request = new HttpGet(getUrl);
            request.setHeader("Content-Type", "application/json");
            
            HttpResponse response = httpClient.execute(request);

            BufferedReader br = new BufferedReader(new InputStreamReader((response.getEntity().getContent())));
           
            for (String temp = ""; temp != null; temp = br.readLine()) {
                //System.out.println(temp);
                output += temp;
            }

2015年3月13日 星期五

[ java ] Convert Milliseconds 2 date & Convert date 2 Milliseconds

package test_fb_api; import java.text.ParseException; import java.text.SimpleDateFormat; import java.util.Calendar; import java.util.Date; import java.util.TimeZone;
public class convertMilliseconds2date {

 public static void main(String[] args) {
  // TODO Auto-generated method stub
  long a= (long) 1.425968092E12;
  long b= (long) 1.4260118825128E12;
  Date date=new Date(b);
  SimpleDateFormat sdf = new SimpleDateFormat("yyyy/MM/dd'T'hh:mm:ss'Z'");
  sdf.setTimeZone(TimeZone.getTimeZone("UTC"));
  String formatTime = sdf.format(date);
  
  System.out.println("convert millisecond to specific date format");
  System.out.println(formatTime);
  System.out.println("");
  
  Date d =new Date();
  try {
    d = sdf.parse("2015/3/27T4:00:54Z");
  } catch (ParseException e) {
   // TODO Auto-generated catch block
   e.printStackTrace();
  }
  long millisec = d.getTime();
  System.out.println("convert specific date format to millisecond ");
  System.out.println(millisec);
  //after convert date to millisecond.
  System.out.println("");
  //convert your result to date
  //insure your method is correct.
  date=new Date(millisec);
  String formatedTime = sdf.format(date);
  System.out.println(formatedTime);
 }

}

console
convert millisecond to specific date format
2015/03/10T06:24:42Z

convert specific date format to millisecond 
1427428854000

2015/03/27T04:00:54Z

2015年3月11日 星期三

[java ] 4 way to copy file & 2 way to copy folder


package test_fb_api;

import java.io.File;
import java.io.FileInputStream;
import java.io.FileNotFoundException;
import java.io.FileOutputStream;
import java.io.IOException;
import java.io.InputStream;
import java.io.OutputStream;
import java.nio.channels.FileChannel;
import java.nio.file.Files;
import java.util.ArrayList;
import java.util.Arrays;
import java.util.HashMap;

import org.apache.commons.io.FileUtils;

public class test4wayCopy {

 public static void main(String[] args) {
  
  System.out.println("copy file");
  String src = "C:/Users/1409035/Desktop/FTP_server_backup/test.txt";
  String des = "C:/Users/1409035/Desktop/FTP_server_backup/candelete/test1.txt";
  copyFileUsingApacheCommonsIO(new File(src), new File(des));
  
  des = "C:/Users/1409035/Desktop/FTP_server_backup/candelete/test2.txt";
  copyFileUsingFileStreams(new File(src), new File(des));
  
  des = "C:/Users/1409035/Desktop/FTP_server_backup/candelete/test3.txt";
  copyFileUsingFileChannels(new File(src), new File(des));
  
  des = "C:/Users/1409035/Desktop/FTP_server_backup/candelete/test4.txt";
  copyFileUsingFileChannels(new File(src), new File(des));
  
  
  System.out.println("done");
  src = "C:/Users/1409035/Desktop/上新版本計畫/eInvoice/";
  des = "C:/Users/1409035/Desktop/FTP_server_backup/candelete/";
  
  copyAllFolder(new File(src), new File(des));
  
  copyAllFolderRecursive(new File(src), new File(des));
  
  System.out.println("copy all folder");
  
 }

 public static void copyAllFolderRecursive(File src, File dest)
 {

  if (src.isDirectory()) {

   // if directory not exists, create it
   if (!dest.exists()) {
    dest.mkdir();
    System.out.println("Directory copied from " + src + "  to "
      + dest);
   }

   // list all the directory contents
   String files[] = src.list();

   for (String file : files) {
    // construct the src and dest file structure
    File srcFile = new File(src, file);
    File destFile = new File(dest, file);
    // recursive copy
    copyAllFolderRecursive(srcFile, destFile);
   }

  } else {
   copyFileUsingApacheCommonsIO(src.getAbsoluteFile(), dest.getAbsoluteFile());
   System.out.println("File copied from " + src + " to " + dest);
  }

 }
 
 
 private static void copyAllFolder(File source, File dest){
  
  try {
   FileUtils.copyDirectory(source, dest);
  } catch (IOException e) {
   // TODO Auto-generated catch block
   e.printStackTrace();
  }
  
 }
 
 /*
  * cover destination file ,although destination file is exist 
  */
 private static void copyFileUsingApacheCommonsIO(File source, File dest)
 {
  try {
   FileUtils.copyFile(source, dest);
  } catch (IOException e) {
   // TODO Auto-generated catch block
   e.printStackTrace();
  }
 }
 
  
 private static void copyFileUsingFileStreams(File source, File dest)
 {
  InputStream input = null;
  OutputStream output = null;
  try {

   input = new FileInputStream(source);
   output = new FileOutputStream(dest);
   byte[] buf = new byte[1024];
   int bytesRead;
   while ((bytesRead = input.read(buf)) > 0) {
    output.write(buf, 0, bytesRead);
   }
   input.close();
   output.close();
  } catch (FileNotFoundException e) {
   // TODO Auto-generated catch block
   e.printStackTrace();
  } catch (IOException e) {
   // TODO Auto-generated catch block
   e.printStackTrace();

  } finally {

  }
 }
 
 /*
  * this one is fastest
  */
 private static void copyFileUsingFileChannels(File source, File dest) {
  FileChannel inputChannel = null;
  FileChannel outputChannel = null;

  try {
   inputChannel = new FileInputStream(source).getChannel();
   outputChannel = new FileOutputStream(dest).getChannel();
   outputChannel.transferFrom(inputChannel, 0, inputChannel.size());
   inputChannel.close();
   outputChannel.close();
  } catch (FileNotFoundException e) {
   // TODO Auto-generated catch block
   e.printStackTrace();
  } catch (IOException e) {
   // TODO Auto-generated catch block
   e.printStackTrace();
  }

  finally {

  }
 }
 
 
 private static void copyFileUsingJava7Files(File source, File dest)
 {
  try {
   Files.copy(source.toPath(), dest.toPath());
  } catch (IOException e) {
   // TODO Auto-generated catch block
   e.printStackTrace();
  }
 }
 
}

2015年3月7日 星期六

[python] FILE I/O (read) & to Dictionary | FILE I/O (write) & input(raw_input)


readFile.py
import pickle
#save object type

file = open('people.txt','r')
print 'the content is ',file.name

people = {}

for line in file.readlines():
   print 'read line:',line
   #rstrip = remove '\n'
   part = line.rstrip().split(' ')
   people[part[1]] = part


print people

print '=========use pickle======'

file.close()

pick = open('picktest.txt','w')
pickle.dump(people,pick)
pick.close

pick = open('picktest.txt')
people = pickle.load(pick)
print(people)


consol
the content is  people.txt
read line: 1 lewis 183 70

read line: 2 leo 175 80

read line: 3 jim 170 60

read line: 4 7 170 80

read line: 5 fai 180 70

{'lewis': ['1', 'lewis', '183', '70'], 'fai': ['5', 'fai', '180', '70'], 'jim': ['3', 'jim', '170', '60'], '7': ['4', '7', '170', '80'], 'leo': ['2', 'leo', '175', '80']}
=========use pickle======
{'jim': ['3', 'jim', '170', '60'], 'lewis': ['1', 'lewis', '183', '70'], 'fai': ['5', 'fai', '180', '70'], '7': ['4', '7', '170', '80'], 'leo': ['2', 'leo', '175', '80']}


people.txt

1 lewis 183 70
2 leo 175 80
3 jim 170 60
4 7 170 80
5 fai 180 70


writeFile.py
#inpput can't get blank

count = input("input how many people:")

list = []

for x in range(count):
        print 'input number name height weight,splite by blank'
        a = raw_input("-->:")
        list.append(a)


print 'your input is ' ,list


f = open('people2.txt','w')
for x in list:
        f.write(x+"\n")

f.close()

consol

([pythonTutorai])lewis@lewis-virtual-machine:~/pythonTutorial/tutorial2$ python writeFile.py
input how many people:3
input number name height weight,splite by blank
-->:6 aa 134 11
input number name height weight,splite by blank
-->:7 bb 431 233
input number name height weight,splite by blank
-->:8 cc 167 70
your input is  ['6 aa 134 11', '7 bb 431 233', '8 cc 167 70']

people2.txt
6 aa 134 11
7 bb 431 233
8 cc 167 70

[python]Passing by reference or value| mutable type &immutable type


variable asign in python is  just a reference,
and all data is object.

但是又分為mutable type (list) & immutable type (String)

Function:
  mutable type  :reference
  immutable type:value


範例如下:


print 'List (mutable type)'
def ange_list_reference(the_list):
    print 'got', the_list
    the_list = ['and', 'we', 'can', 'not', 'lie']
    print 'set to', the_list

outer_list = ['we', 'like', 'proper', 'English']

print 'before, outer_list =', outer_list
ange_list_reference(outer_list)
print 'after, outer_list =', outer_list

print '==================================='


print 'String(immutable type)'

def try_to_change_string_reference(the_string):
    print 'got', the_string
    the_string = 'In a kingdom by the sea'
    print 'set to', the_string

outer_string = 'It was many and many a year ago'

print 'before, outer_string =', outer_string
try_to_change_string_reference(outer_string)
print 'after, outer_string =', outer_string


print 'Int (immutable type)'

def change_int(the_int):
    print 'got', the_int
    the_int = '9'
    print 'set to ',the_int

outer_int  = 1

print 'before ,outer_int=',outer_int
change_int(outer_int)
print'after ,outer_int=' ,outer_int


print 'asign operation is use reference not copy'
print 'example:'
L = [1,2,3]
M = ['X' ,L, 'Y']
print M
print 'set L[0]=9'
L[0]=9
print M
print 'the content of M will be set too'


print'============='
print 'if dont want set M, you need use copy'
L = [1,2,3]
M = ['X',L[:],'Y']
print M
print 'set L[0]=9'
L[0] = 9
print M
print 'the content of M wont be set '

consol
===================================
String(immutable type)
before, outer_string = It was many and many a year ago
got It was many and many a year ago
set to In a kingdom by the sea
after, outer_string = It was many and many a year ago
Int (immutable type)
before ,outer_int= 1
got 1
set to  9
after ,outer_int= 1


asign operation is use reference not copy
example:
['X', [1, 2, 3], 'Y']
set L[0]=9
['X', [9, 2, 3], 'Y']
the content of M will be set too
=============
if dont want set M, you need use copy
['X', [1, 2, 3], 'Y']
set L[0]=9
['X', [1, 2, 3], 'Y']
the content of M wont be set

2015年3月6日 星期五

[ubuntu] Configure Static IP Address on Linux VM in VMware Player


Everytime I use putty to connect VM,
It's ip will be changed.
This situation is very annoying.
So i decide to set static.IP
There are three networking options for virtual
machines running there: Bridged, NAT, Host-Only.
I use NAT in order to coneect web.
see this  BLOG for detail

$ sudo vim /etc/network/interfaces
# This file describes the network interfaces available on your system
# and how to activate them. For more information, see interfaces(5)
# The loopback network interface
auto lo
iface lo inet loopback
# The primary network interface
auto eth0
iface eth0 inet static
  address 192.168.22.146
  netmask 255.255.255.0
  broadcast 192.168.22.255
  gateway 192.168.22.2
dns-nameservers 192.168.22.2


you need to restart
$ sudo service networking restart


then you will encounter a problem,
lewis@lewis-virtual-machine:~$ sudo service networking restart
stop: Job failed while stopping

let's to check log
lewis@lewis-virtual-machine:~$ sudo  tail -f /var/log/upstart/networking.log
Stopping or restarting the networking job is not supported.
Use ifdown & ifup to reconfigure desired interface.

//it indicate that not supported

So use this to do
$ sudo ifdown eth0 && ifup eth0
$ sudo /etc/init.d/networking restart


ref:

2015年3月5日 星期四

[java] monitoring menory & try list.clear() vs new List : Which one will be better


package test_fb_api;

import java.util.ArrayList;
import java.util.List;

public class testMemory {

    public static void main(String[] args) {

        int kb = 1024;

        //Getting the runtime reference from system
        Runtime runtime = Runtime.getRuntime();

        //Print used memory
        System.out.println("Used Memory:" + (runtime.totalMemory() - runtime.freeMemory()) / kb);

        //Print free memory
        System.out.println("Free Memory:" + runtime.freeMemory() / kb);

        //Print total available memory
        System.out.println("Total Memory:" + runtime.totalMemory() / kb);

        //Print Maximum available memory
        System.out.println("Max Memory:" + runtime.maxMemory() / kb);

        List list = new ArrayList<>();
        for (int i = 0; i < 100000; i++) {
            for (int j = 0; j < 10000; j++) {
                list.add("abcdefghij" + i + j);
            }
            if (i % 200 == 0) {
                try {
                 System.gc();
                    Thread.sleep(100);
                    System.out.println("Free Memory:" + runtime.freeMemory() / kb + " Kb");
                } catch (InterruptedException e) {
                    // TODO Auto-generated catch block
                    e.printStackTrace();
                }
            }
        }
        
        System.out.println("done");
    }
}


you can add code to line38 to monitoring
1. list.clear
2. list = new list();

ref:http://stackoverflow.com/questions/6757868/map-clear-vs-new-map-which-one-will-be-better

2015年3月4日 星期三

[ubuntu] cp


cp -r getBookList    / /opt/app/abStore/data/Ibobar/getBookList
       來源             目的地

-a  :相當於 -pdr 的意思,至於 pdr 請參考下列說明;(常用)
-d  :若來源檔為連結檔的屬性(link file),則複製連結檔屬性而非檔案本身;
-f  :為強制(force)的意思,若目標檔案已經存在且無法開啟,則移除後再嘗試一次;
-i  :若目標檔(destination)已經存在時,在覆蓋時會先詢問動作的進行(常用)
-l  :進行硬式連結(hard link)的連結檔建立,而非複製檔案本身;
-p  :連同檔案的屬性一起複製過去,而非使用預設屬性(備份常用);
-r  :遞迴持續複製,用於目錄的複製行為;(常用)
-s  :複製成為符號連結檔 (symbolic link),亦即『捷徑』檔案;
-u  :若 destination 比 source 舊才更新 destination

[java][log4j] Install Log4j & how to use it


1. 下載log4j的jar檔 (log4j.1.12.17.jar)

2. 放到C:\Users\1409035\workspace\NewsstandWS\web\WEB-INF\lib 底下

3. 新增一個log4j_WS.properites檔放到
   C:\Users\1409035\workspace\NewsstandWS\web\WEB-INF\properties 底下
   設定內容直接參考code

4. 新增 Log4JInitServlet.java 到
   C:\Users\1409035\workspace\NewsstandWS\src\java\com\ws\controller
   做為初始化用 

5. 修改 web.xml 新增如下
   
    Log4JInitServlet
    com.ws.controller.Log4JInitServlet
     
    log4j-properties-location
        /WEB-INF/properties/log4j_WS.properties
     
    1 
   

6. 使用範例
   final Logger log = Logger.getLogger(GetZinioDataJobs.class);
   log.info("orderBook info message");


參考:
http://www.programcreek.com/2009/06/a-simple-example-to-show-how-to-use-java-properties-file/ [^]
http://www.avajava.com/tutorials/lessons/how-do-i-initialize-log4j-in-a-web-application.html [^]
http://www.codejava.net/coding/how-to-initialize-log4j-for-java-web-application [^]
http://toyangel.pixnet.net/blog/post/32953401-eclipse-%E4%BD%BF%E7%94%A8-log4j-%E7%9A%84%E5%BF%AB%E9%80%9F%E8%A8%AD%E5%AE%9A [^]


簡單版:
log4j.properties
直接放到src/java下面

web.xml
也可拿掉上述所新添加的部分。


===========================================
原因:
tomcat 啟動時的順序-->
tomcat --> AP(newsstands) -->看底下web-inf 裡面的classes jar, 
因為log4j 已經有default , 且我又將 properties 命名為 logj4.properties
所以他default找的到這隻,
如果我不命名為 logj4.properties,
就要遵循 本篇一開始的步驟

============================


將log4j改為 大於 10M 就產生新的檔案
# A2 is set to be a file
# produce log record document every day
#log4j.appender.A2 = org.apache.log4j.FileAppender
log4j.appender.A2 = org.apache.log4j.RollingFileAppender
log4j.appender.A2.layout = org.apache.log4j.PatternLayout
log4j.appender.A2.layout.ConversionPattern = [%d{yyyy-MM-dd HH:mm}][%p][%C-%L] %m%n
log4j.appender.A2.File =/volume1/homes/tomcatupload/logs/system_notice.log
log4j.appender.A2.MaxFileSize=10MB 

log4j.appender.A2.DatePattern = '.'yyyyMMdd-HHmm


log4j寫到不同file
=======================================================================
  log4j.rootLogger=TRACE, stdout

  log4j.appender.stdout=org.apache.log4j.ConsoleAppender
  log4j.appender.stdout.layout=org.apache.log4j.PatternLayout
  log4j.appender.stdout.layout.ConversionPattern=%d [%24F:%t:%L] - %m%n

  log4j.appender.debugLog=org.apache.log4j.FileAppender
  log4j.appender.debugLog.File=logs/debug.log
  log4j.appender.debugLog.layout=org.apache.log4j.PatternLayout
  log4j.appender.debugLog.layout.ConversionPattern=%d [%24F:%t:%L] - %m%n

  log4j.appender.reportsLog=org.apache.log4j.FileAppender
  log4j.appender.reportsLog.File=logs/reports.log
  log4j.appender.reportsLog.layout=org.apache.log4j.PatternLayout
  log4j.appender.reportsLog.layout.ConversionPattern=%d [%24F:%t:%L] - %m%n

  log4j.category.debugLogger=TRACE, debugLog
  log4j.additivty.debugLogger=false

  log4j.category.reportsLogger=DEBUG, reportsLog
                 可自訂 可自訂
  log4j.additivty.reportsLogger=false
 

  [The configure the loggers in the Java code thusly:]

  static final Logger debugLog = Logger.getLogger("debugLogger");
  static final Logger resultLog = Logger.getLogger("reportsLogger");
=========================================================================
[Do you want output to go to stdout? If not, change the first line of log4j.properties to:]

  log4j.rootLogger=OFF
  and get rid of the stdout lines.


參考http://stackoverflow.com/questions/9652032/how-can-i-create-2-separate-log-files-with-one-log4j-config-file [^]


[java]use "return" is better than System.eixt(0)


Because as far as the compiler is concerned, 
System.exit() is just another method call.

The fact that what it does is end the process can only 
be found out from the implementation 
(which is native code, not that it makes any difference).

If you have to put System.exit() in your code 
(usually it's best to avoid it, unless you want to return a code other than 0), 
it should really be in a method that returns void, main() for example. It's nicer that way.

As for the reachability, the explanation is the same: 
return is a keyword of the Java language, 
so the compiler or the parser the IDE uses can tell 
that it's theoretically impossible for code after the return statement to be executed.

[java] 讓double 小數點的位數 是固定的(可指定的) | fix the digit of double


String.format("%.2f",10.264)

console
10.26

2015年3月3日 星期二

[solr][searchEngine] Solr install on ubuntu


====================================================================
 installing Oracle Java 7 before installing Tomcat7:

$ sudo apt-get purge oracle-java6-installer
$ sudo apt-get install software-properties-common python-software-properties
$ sudo add-apt-repository ppa:webupd8team/java
$ sudo apt-get update
$ sudo apt-get install oracle-java7-installer
$ sudo apt-get install tomcat7 tomcat7-admin

===================================================================


Solr 4.10.1

$ cd ~
$ curl http://www.eu.apache.org/dist/lucene/solr/4.10.1/solr-4.10.1.tgz [^] > solr-4.10.1.tgz
$ tar xzvf solr-4.10.1.tgz
$ sudo mv solr-4.10.1 /usr/share/solr
$ cd /usr/share/solr/example
$ sudo cp webapps/solr.war multicore/solr.war
$ cd /usr/share
$ sudo cp -r solr/example/lib/ext/* tomcat7/lib/
$ sudo cp -r solr/example/resources/log4j.properties tomcat7/lib/

Configure

Edit log4j.properties and set the solr.log setting:

$ sudo nano /usr/share/tomcat7/lib/log4j.properties

Set there solr.log=/usr/share/solr.

Now, let’s a get Solr into Tomcat Catalina config. Create a new solr.xml file:

$ sudo nano /etc/tomcat7/Catalina/localhost/solr.xml

and add


Add Tomcat GUI administrative users:

$ sudo nano /etc/tomcat7/tomcat-users.xml

Add the tomcat user within the block:


Ensure correct permissions:

$ sudo chown -R tomcat7 /usr/share/solr/example/multicore

Restart Tomcat:

$ sudo service tomcat7 restart

Testing

You are able now to access the Solr administrative interface at http://localhost:8080/solr. [^]

參考http://webikon.com/cases/installing-apache-solr-4-7-multicore-on-ubuntu-12-04-and-tomcat7 [^]


2015年3月2日 星期一

[SQL] Stored Routines

Stored Routines (Stored procedures & Stored functions)
自定義一連串的sql語句與function.


Stored procedures

新增
mysql> delimiter $$
mysql> create procedure procedure_table ()
    -> begin
    -> select* from testtable2 where name = 'lewis';
    -> select* from testtable where car >110;
    -> end $$
Query OK, 0 rows affected (0.00 sec)

mysql> delimiter ;
mysql> ;
ERROR:
No query specified


使用
mysql> call procedure_table();
+----+-------+------+-------+-----+-------+
| id | name  | job  | price | car | title |
+----+-------+------+-------+-----+-------+
|  1 | lewis | sw   | 2     |   2 | NULL  |
|  2 | lewis | sw   | 3     | 111 | NULL  |
+----+-------+------+-------+-----+-------+
2 rows in set (0.01 sec)


刪除
mysql> drop procedure if exists procedure_table;
Query OK, 0 rows affected (0.00 sec)

mysql> call procedure_table();
ERROR 1305 (42000): PROCEDURE testdb.procedure_table does not exist


Stored functions

有參數
mysql> delimiter $$
mysql> create function sumarg(n1 int, n2 int)  
returns int                 
begin return n1 + n2 ; end$$
Query OK, 0 rows affected (0.00 sec)

mysql> select sumarg(1,3);
+-------------+
| sumarg(1,3) |
+-------------+
|           4 |
+-------------+
1 row in set (0.00 sec)


無參數
mysql> delimiter $$
mysql> create function datetest() returns varchar(24) 
begin                
declare d,t,w varchar(24); 
set d = date_format(curdate(),'%y/%m/%d'); 
set t = time_format(curtime(),'%y/%m/%d'); 
set w = dayname(curdate()); 
return concat(d,' ', t ,' ',w); end$$
Query OK, 0 rows affected (0.00 sec)

mysql> delimiter ;
mysql> ;
ERROR:
No query specified

mysql> select datetest();
+--------------------------+
| datetest()               |
+--------------------------+
| 15/02/14 00/00/00 Saturd |
+--------------------------+
1 row in set, 1 warning (0.00 sec)